
After doing many versions of focaccia, bagels, pretzels and sourdough bread, it was obvious that during the rising period, or proofing, that temperature control is critical. We were using a stainless steel bowl, a pyrex plate as a cover and an incandescent lamp to raise the temperature. This made our proofing take many hours. For sourdough, even 6 hours was not enough.
Many DIY options exist. This is not complex. You need a heat source, humidity, an enclosed box and maybe a fan. It is also nice to see the dough rise.
This article, How To Make Your Own Proofing Box, talks about proofing and the requirements of a proofing box.
Plastic Cooler
One option is a plastic picnic cooler by BobS, a lamp and a temperature controller. I am sure it works well. You cannot see inside. It is inexpensive, I have all the components, and it packs neatly away.

Proofing box, DIY: plastic picnic cooler, a lamp and a temperature controller. It works!
Wooden Frame, aluminum insulation
This option is a home built wooden frame with aluminum insulation. The back and bottom seems to be plywood. it is not as strong, takes up space, but has multiple shelves for proofing. The door has a plastic insert, so you can see inside. It is inexpensive and easy to build, I have all the wood and parts. It can take full sheet pans!

Proofing Box: DIY, wooden frame, plywood back and bottom, aluminum sides, multiple shelves, heat lamp, see-through door
Plastic Proofing Box
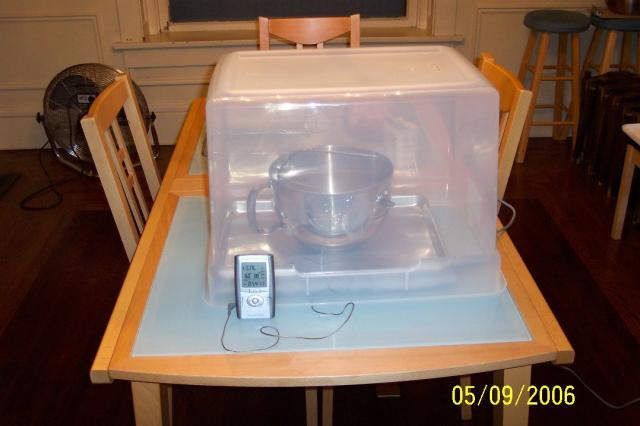
This version is an overturned plastic see-through box that you set on your table! You add a lamp as the heat source, and stick a thermometer through a hole. It is very simple, inexpensive, can be packed away, and you can see your dough. I don’t know if I need more room than this.

Proofing Box: DIY, overturned transparent plastic container, automotive lamp, thermometer
This plastic proofing box uses a heating pad.
Proofing Box: DIY, plastic, heating pad
Collapsible Wooden Proofing Box
This collapsible proofing box sits on your counter. It has 4 plywood sides held together with magnetic catches, a plywood top, ceramic heater with a temperature control. It is a bit fancy. You cannot see inside. As it is collapsible it takes up less space. The magnetic catches should be strong enough, but could break apart if hit. The ceramic heater, temperature controller and thermister is a bit complex. I could make this.

Proofing Box: DIY, collapsible, wooden sides and top, sits on a table, ceramic heater
Here’s another wooden proofing box This would be simple to make in an afternoon.

Proofing Box: DIY, all wood, lamp
Microwave Carcass
Someone gutted a broken microwave carcass, but this takes up counter space, microwaves are not insulated, they are a bit small. I could do this, gut the electronics, patch up the holes, add a lamp, but it is too bulky.
Your Oven
Using your existing oven seems a good option, and the one I will try. The oven is very well insulated, large enough, always there, and has a window to see the dough. I’ll try adding a lamp inside and see how this goes. I’ll add a cup of hot water for humidity. I have a remote outdoor temperature and humidity sensor, which I can put into the oven as well, but this might not be necessary. The oven already has wire shelves, but maybe I’ll add a wooden cutting board in there for support.
Not all solutions need to be complex. The oven option is simplest, cheapest and less complex, being only one step further than setting the dough on a counter with a lamp.