

Delta 36-510C table saw has a terrible fence. The fence clamps to an inclined front area, resulting in an inefficient clamp, which moves when you use it.

Delta 36-510C table saw has a terrible fence. The fence clamps to an inclined front area, resulting in an inefficient clamp, which moves when you use it.
Overall Fence Design
The general idea of the table fence is to have a straight horizontal sliding surface at the front of the saw. This would resist any forward/aft movement, which would change the right angle to the blade and introduce inaccuracy. I would need to be able to clamp down the front to a solid surface. Since the rear of the saw was already flat, I could add a clamp to the rear to make it even more stable. I chose a metal “U” channel as the front sliding surface. Sliding in the U-Channel will be a wood slide. Within the wood slide I would add a bolt, which I could tighten against the metal U-channel. The wood slide will have a straight piece of wood as the fence, with a secondary clamp mechanism that would tighten to the rear of the table surface.

Delta 36-510C DIY table fence, completed. Metal u-channel attached to the wood horizontal front surface, wood slider, wood fence. Photo 2 by Don Tai
Creating a Flat front Surface
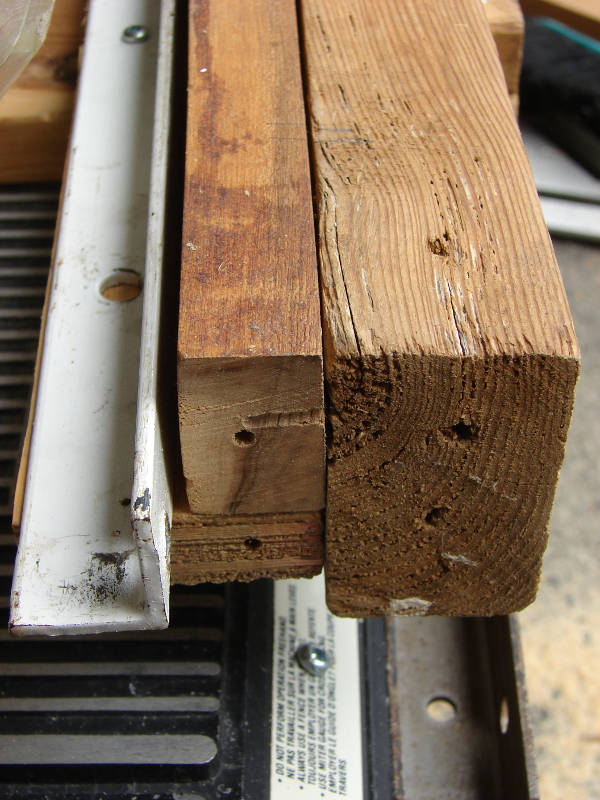
The first issue was the inclined front face. While to does look somewhat nice, what a terrible design. I needed to make this front surface flat. My solution was to add inclined pieces of wood to the inside of the hollow front incline in order to strengthen it. Once strengthened I would add a piece of wood to its front face to make it flat.

Delta 36-510C DIY table fence. Cut inclined pieces of wood as infill, glue them to a straight piece of wood on the bottom. Photo 1 by Don Tai
Metal U-Channel Sliding Channel
As the wood face is screwed through the metal front inclined surface, down through both horizontal wood front braces, it is pretty secure. The u-metal channel is first screwed into the front horizontal wood face. The wood slider will slide against the front of the u-channel, so there is no issue with the protruding screws on the rear face. I did not have a long enough u-channel for the complete width of the saw, but it was long enough and stable enough.

Delta 36-510C DIY table fence, completed. Metal u-channel attached to the wood horizontal front surface. Photo 3 by Don Tai

Delta 36-510C DIY table fence, completed. Metal u-channel attached to the wood horizontal front surface. Photo 4 by Don Tai

Delta 36-510C DIY table fence, saw model number plate. Photo 12 by Don Tai
Adding a metal sliding strip, building up the slider
Now that I have a metal u-channel to slide in, I need to build the slider. I used a white metal “L” bracket on the inside of the u-channel, and a wood front face on the outside of the front u-channel face, to sandwich the front face of the u-channel. This sandwich needed to be tight enough to not have much forward/aft movement, but loose enough to be able to slide. There is a wood brace on top to hold the “L” bracket and the front brace tight together. The metal screws through the “L” bracket to the top wood brace do not affect the slider because it is within the hollow U-channel.

Delta 36-510C DIY table fence, slide has a metal L bracket on the back and a front wood brace. Photo 5 by Don Tai
Delta 36-510C DIY table fence, slide has a metal L bracket on the back and a front wood brace. Photo 6 by Don Tai
Adding the Slider Tightening Bolt
Once positioned in place the slider needs a tightening bolt in order for the slider to stay in place. This bolt was drilled through the two front braces and tightens against the U-channel. A nut is placed inside the wood brace that is against the u-channel.

Delta 36-510C DIY table fence, slide has a tightening bolt at the front. Photo 7 by Don Tai
The Wooden Fence
I used a straight piece of 2×8 as the fence. It is low, so I’ll add a taller fence later. The fence is screwed into the front slider at 90 degrees to the blade. I left some room at the end and added a secondary clamp to the back of the saw top. It works well. The rear brace is glued and screwed. I also added a nut to the brace.

Delta 36-510C DIY table fence, fence is a 2×8 with a rear clamp. Photo 8 by Don Tai

Delta 36-510C DIY table fence, fence is a 2×8 with a rear clamp. Photo 9 by Don Tai

Delta 36-510C DIY table fence, fence is a 2×8 with a rear clamp. Photo 10 by Don Tai
Added a Metal Measuring Gauge
The only benefit of the inclined front surface is that there is a tape measure there. I added a metal plate to the slide, where one of the holes of the plate is aligned with the zero mark when the fence is right beside the blade. Unfortunately i forgot about the blade teeth, so the gauge is 1/16 too narrow. Still, it works well. In the photo the measuring gauge is set to 2.5″, if you look straight at the gauge.

Delta 36-510C DIY table fence, measuring gauge set at 2.5 inches. Photo 11 by Don Tai
Adding Relief for Blade Adjustment
For the blade height and angle adjuster I had to add some relief to the bottom of the front brace, so used a Forstner bit and gouged out some wood. This allowed the tightener to close better. The right side slopes up too much but it still tightens down adequately.

Delta 36-510C DIY table fence, added relief for saw blade tightener. Photo 13 by Don Tai
Overall Performance
The DIY fence works very well. I have done long cuts at 1″, 2.5″ at 90 degrees and 45 degrees, and the fence does not move. I will need to make the fence higher so that I can add more jigs, but overall I am happy. This took much longer than I expected, but I like to think out the design first.
Addendum: As I tighten the bolt, it would squeeze against the metal U-channel to tighten down, but at the same time it would shift slightly at the same time, throwing my accuracy off. My solution was to add a metal L-bracket between the bolt end and the metal U-channel. The L-bracket was chiselled into the wood, so it is flat to the gap between the fence and the U-channel, and is loose so it can move slightly. The bolt now contacts the metal L-bracket, which then presses into the U-channel, tightening it down. This fix works well and is much more accurate.

I added this L-bracket into the fence so that the tightening bold will press on the L-bracket, which will squeeze tight against the metal U-channel. This is more accurate. Photo by Don Tai
Pingback: First Tongue and Groove Joint in Wood – Don Tai (Canada) Blog
Here it is -13 May 2025. I can buy this saw for $40 Canadian, but it has no fence.
Wow – you did a great job on the replacement, but almost too much work for me.
I need something that is portable. This one seems too heavy for my needs.
Thanks for sharing.
[Don: This Delta 36-510C table saw design is quite old and frankly not worth $40Cad. Perhaps maybe $25Cad, but then you’d have to put in a lot of work to make an accurate fence. The fence that came with the saw was terrible to begin with. There is no splitter bar at the back of the saw as well, so somewhat more dangerous than a newer saw. I don’t think the saw is too heavy. Find a contractor saw, pay a little more money for something like a Dewalt, with a very accurate fence.]