
1. From Eclipse I tried to start emulator for AVD and received a “Failed to start emulator: Cannot run program” “//tools/emulator” error. Of course this was totally misleading. In the end the problem was I had a 64 bit system but Android’s emulator is a 32 bit program. This caused the error. After reading lots of posts that were not useful I found a good one on Stack Exchange: How to run 32-bit app in Ubuntu 64-bit?. It is critical to ensure that you receive answers for your version of Ubuntu, as solutions for an older version will not work. I followed the green check mark answer and the Android emulator showed up without any error. Happy days, but somewhat frustrating.
2. Android Emulator displays but does not turn on. Solution: uncheck “use host GPU”, and the device will turn on. I guess for Ubuntu this does not work? source, known bug
3. Emulator Acceleration for Ubuntu 14.04: It looks like graphics acceleration for the emulator is only available for Android 4.0.3 (API Level 15) or higher. Install KBM instructions for Ubuntu. They have great instructions to ensure you can install KVM. KVM Project.
Check if you hardware Ok for KVM
$ sudo apt-get install cpu-checker
$ kvm-ok
INFO: /dev/kvm exists
KVM acceleration can be used
4. LogCat Error “r cannot be resolved to a variable“: Rebuild (automatic), from the menu “Project”, “Clean”. All errors went away. solution
5. Emulator does not show test app: In Eclipse, Run Configurations, Android App, new, choose a project and target, apply, run. source
6. I’m following the developer.android.com tutorial, and the “Building a Simple User Interface” lesson seems to not work. We started with the standard “Hello World” app, which is fine. This lesson builds on the “Hello World” app, but the “Hello World” literal is still displaying on the screen, but is not in this lesson. How do I remove the “Hello World” literal? Once I put in some line breaks the input box appeared. Fix: I forgot to remove the TextView element. XML comments: angle bracket left !– comment –angle bracket right.
7. Class Fragment error, API level too low: Developer.android.com, lesson “Starting Another Activity”, under “Building your First App”, the starting lessons state you need a minimum of Froyo, API 8, but you get stuck with an error in this lesson. Undocumented, the API level too low. The code extends class Fragment, which is at API level 11. I’m on API level 8, so I had to upgrade just to compile. Damn. source This inconsistency in the first couple of lessons is sure to throw off many beginners like myself.
The android:parentActivityName attribute declares the name of this activity’s parent activity within the app’s logical hierarchy. The system uses this value to implement default navigation behaviors, such as Up navigation on Android 4.1 (API level 16) and higher. You can provide the same navigation behaviors for older versions of Android by using the Support Library and adding the
element as shown here.
8. “fragment_display_message” not found. Changed code to “1”. source. Since I changed the API level, I need another emulator model to run. I configured a Nexus S with API 3.0, which worked but displays in landscape. To change the emulator to landscape CTRL F11. source
9. Copy an Android project in Eclipse: Highlight your project in Package Explorer. Cntrl C and cntrl V, Eclipse will ask you for the name of your new project, input this and you’re done. Very efficient. source
10. Adding the Action Bar, Adding Action buttons: Create res/menu/main_activity_actions.xml but not in the bin/res/ directory. Yes, there is yet another /res directory. I mixed these up and my code did not work.
11. Add images to Android Project using Eclipse: Oh crap that was easy in Eclipse. Thanks, dturvene. Here is the easy way if you’re using Eclipse:
- Ctrl+N (emacs keybindings) to open the file wizard
- Select Android, “Android Icon Set”
- Edit name ic_action_xx, click Next
- Clipart, choose the icon you want
- Select theme (Holo Light means a light background, Holo Dark means a dark background)
Eclipse will automatically populate the res/drawable-* directories with the new icon, scaled to the directory size. No need to download anything, understand PNG or copy the icon into multiple directories.
12. Missing methods openSearch() and openSettings(). Apparently the code from developer.android.com is incomplete. This is Ok for experienced developers, but not at all ok for learners. I need to code these methods myself. Thankfully StackOverflow people are here to help.
Those two methods are just examples how selecting an option can start an action. The implementation was not provided because it was irrelevant to the example. Note that it is not a tutorial, but a single and un-compile-able example of how to add behavior to an options item.
public boolean onOptionsItemSelected(MenuItem item) {

    int id = item.getItemId();

    switch(id){

    case R.id.action_search :

        startActivity(new Intent(Settings.ACTION_SEARCH_SETTINGS));

        return true;

    case R.id.action_settings :

        startActivity(new Intent(Settings.ACTION_INPUT_METHOD_SETTINGS));

        return true;

    default :

    return super.onOptionsItemSelected(item);

    }

}
Toast.makeText(this, "Compose button pressed", Toast.LENGTH_SHORT).show();
source
13. Menu option will not display on Menu Bar: I had to change “android” to “app” fpr this to work. I stared at this code for a long time, not seeing it until someone pointed it out.
You already had the custom namespace defined (“app”, in the menu tag). You need to change the android:showAsAction tag to app:showAsAction according to the Android guide.
source, or another source
< menu xmlns:android="http://schemas.android.com/apk/res/android"
    xmlns:app="http://schemas.android.com/apk/res-auto" >
< item
android:id="@+id/menu_lang"
app:showAsAction="always"
android:title="@string/menu_lang"
android:icon="@android:drawable/ic_input_lang"/>
< /menu>
14. Add App icon to menu bar: This will be the same icon as the launcher icon. Add to the manifest.xml: android:icon=”@drawable/launcher_icon”. Then add to the onCreate method in MainActivity.java:
ActionBar ab =getSupportActionBar();
ab.setDisplayShowHomeEnabled(true);
ab.setIcon(R.drawable.launcher_icon);
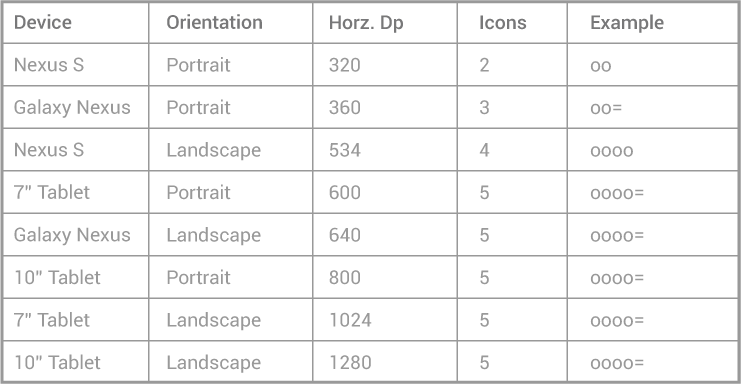
15. Number of icons in Action Bar for devices: I am testing on a Nexus S emulator. The chart says that there is room for 4 icons on the action bar, but my code, with showAsAction=ifRoom only shows one. I don’t know why and cannot find a solution on SO. Yes, there are dpi constraints and yes, there is the chart, but it seems like my code is wasting space on the action bar. Of course I can force it by showAsAction=always. Others seem to have the same issue of not able to use the space on the action bar.
developer.android.com’s actionbar document.
16. Styling the Action Bar: Theme.Holo.Light.DarkActionBar only available for API 14 or higher. Docs say it is available for API 11, which is incorrect. Theme.Holo.Light. I am using Theme.AppCompat.Light, which is good for API 11 and turns into Holo for API 14 and up.
17. Nexus 5 Emulator Settings: These were a little hard to fiddle. API 21, Intel Atom (X86_64), WVGA800, internal Storage 1G, no host GPU. It them appeared an it works.
18. Android AVD Cannot Create Device: known bug, must take another, clone it, then change settings. It works. source
19. Adding a Help Screen: This was not so easy for a beginner, and I knew it. I got the most help from Creating Help and Settings screens in Android. You’ll also need to add to Strings.xml, but Eclipse will give you a not so gentle reminder!
DisplayHelpAcivity.java
public class DisplayHelpActivity extends ActionBarActivity {
@Override
protected void onCreate(Bundle savedInstanceState) {
super.onCreate(savedInstanceState);
setContentView(R.layout.activity_help);
}
public void dismiss(View v) {
finish();
}
}
activityhelp.xml
< ?xml version="1.0" encoding="utf-8"?>

< RelativeLayout xmlns:android="http://schemas.android.com/apk/res/android"
    xmlns:tools="http://schemas.android.com/tools"
    android:layout_width="match_parent"
    android:layout_height="match_parent"
    android:orientation="vertical"

    android:paddingBottom="@dimen/activity_vertical_margin"
    android:paddingLeft="@dimen/activity_horizontal_margin"
    android:paddingRight="@dimen/activity_horizontal_margin"
    android:paddingTop="@dimen/activity_vertical_margin"
    tools:context="com.dontai.myandroidactivity.DisplayHelpActivity" >
< TextView android:layout_width="wrap_content" android:layout_height="wrap_content" android:text="@string/extra_help_message" />
< Button android:id="@+id/button1" android:layout_width="wrap_content" android:layout_height="wrap_content" android:layout_alignParentBottom="true" android:layout_alignParentRight="true" android:onClick="dismiss" android:text="@string/button_ok" />
< /RelativeLayout>
Add this to your manifest:
< activity
    android:name="com.dontai.myandroidactivity.DisplayHelpActivity"
    android:label="@string/title_help_display_message"
    android:parentActivityName="com.dontai.myandroidactivity.MainActivity" >


    < /activity>
20. Display text formatted in html on help screen: This displays text and renders html tags.
DisplayHelpActivity.java
protected void onCreate(Bundle savedInstanceState) {

        super.onCreate(savedInstanceState);

        setContentView(R.layout.activity_help);
TextView foo = (TextView)findViewById(R.id.text_1);
foo.setText(Html.fromHtml(getString(R.string.help_text)));
}
Ensure that text_1 is a valid ID for the textView in activity_help.xml. help_text must be defined in strings.xml.
source The source threw me off because he used foo twice for two different purposes. The second foo needs to be a valid id in the TextView in activity_help.xml. Here is a complete example that tipped me off about the TextView id.
Java Log
–Eclipse and Java for Total Beginners
–Simple JUnit test
–Creating a new instance of an object, so you can assign variables (states) or invoke methods (behaviours)
-Where you call your main(), make all your methods public and static. All methods within the same class as main() need to be static and all methods in different classes need to be public. That was hard.